Last updated November 18, 2026








Free written scope consultation - allowances, timeline, and change-order rules on paper before a single trade is scheduled
Bathroom Remodeling Troubleshooting: Common Problems and How to Fix Them
Grout cracking in a newly remodeled shower within six months almost never means bad grout. It means the tile substrate flexed and the movement telegraphs straight up through the grout lines. That’s a waterproofing and framing problem wearing a cosmetic costume. The same pattern repeats across nearly every bathroom complaint we get called out to look at in Grand Prairie: a visible symptom that points to a root cause hidden one or two layers beneath the surface. This guide works backward from what you can see – cracked grout, lifted floor tile, a toilet that rocks, peeling paint – to the actual failure point underneath, so you fix the right thing instead of patching the symptom every spring.
Quick Answer
Most bathroom remodel problems trace back to one of four root causes: a substrate that wasn’t stiff enough for tile, a waterproofing membrane that was skipped or installed wrong at the seams and corners, a missing expansion joint, or an exhaust fan that’s undersized for the room. Fix the root cause and the symptom stays fixed; patch the symptom alone and it comes back within a season or two. Diagnosis is almost always cheaper than re-guessing.
Styles & brands we work with
- Kitchen remodeling
- Bathroom remodeling
- Home additions & ADU
- Roofing
- Windows & doors
- Driveway & pavers
- Fence
Table of Contents
- Symptom-to-Root-Cause Map
- Why Is My New Grout Cracking?
- Caulk Separating at the Tub Surround
- Floor Tile Lifting or Hollow-Sounding
- Diagnosing a Shower Leak vs. Condensation
- Toilet Rocking and Soft Subfloor
- Exhaust Fan Inadequacy: The Hidden Culprit
- How a Warranty Claim Should Actually Work
Symptom-to-Root-Cause Map
Start here. Before you spend a dollar on repair, match the symptom you’re seeing to the likely failure point. In our experience across Grand Prairie bathrooms, roughly four out of five “cosmetic” complaints trace back to a rough-in or waterproofing decision made weeks before the first tile went up.
- Grout cracking in a shower wall or floor → substrate flex, missing movement joint, or a backer board installed without the right fastener schedule.
- Caulk separating at the tub or shower pan joint → differential movement between two different materials, often because the joint was grouted instead of caulked, or the tub was set without a proper ledger.
- Floor tile lifting or sounding hollow → thinset that skinned over before the tile was set, inadequate subfloor deflection, or no uncoupling membrane.
- Water stain on the ceiling below → shower pan or supply line leak, not condensation (see the diagnostic section below).
- Toilet rocking with a squishy feel underfoot → failed wax ring, loose closet flange, or rotted subfloor around the drain.
- Peeling paint or mold on the ceiling and upper walls → exhaust fan that can’t move enough air for the room’s cubic footage.
- Grout turning dark or hazy and staying that way → efflorescence from moisture migrating through the tile assembly, usually a waterproofing gap.
If your bathroom is in the middle of a larger kitchen-and-bath renovation, the same rough-in discipline applies. The crew setting cabinets and the crew setting tile are working off the same plan, and a rough-in shortcut in one room often shows up as a symptom in the other. You can read more about how we sequence full-home work on our Bradford Remodeling Co Grand Prairie home page.
Why Is My New Grout Cracking?
New grout cracks because the surface underneath it moved, not because the grout mix was bad. Grout is a rigid material with almost no flexibility. When the tile substrate deflects even a sixteenth of an inch underfoot, or when two planes of the shower meet without a flexible joint, the grout takes the movement and splits.
Here are the four root causes we check in order:
- Substrate deflection. The floor joists under the bathroom flex more than the tile assembly can tolerate. The fix is adding blocking or a second layer of subfloor before tile, not re-grouting.
- Missing movement joints. Tile needs a gap at every change of plane and every perimeter wall. Grout there guarantees a crack. The correct material is a flexible sealant, not grout.
- Backer board installed without the manufacturer’s fastener schedule. Screws too far apart let the board flex between them. Pull a tile and check.
- Thinset that cured before the tile went down. If the mortar skins over, it never bonds. That leaves a tile floating on a dead bed of thinset, and the first seasonal temperature swing in a Grand Prairie bathroom cracks the joint.
Repair path: regrout only if the substrate is sound and the crack is a single hairline at a movement joint (in which case, replace that joint with sealant and leave the rest alone). If the crack runs through multiple tiles or comes back within weeks, pull a sample tile and check the thinset coverage. If it’s under 80 percent, the assembly needs to come up. That’s a hard truth, but it’s cheaper than re-grouting every six months forever.
Caulk Separating at the Tub Surround
Caulk pulls away from a tub surround when the tub and the wall move independently, and they almost always will. A cast iron tub moves less than an acrylic one, and an acrylic tub set on a foam bed still flexes when someone steps in. That flex shears the caulk bead at the joint over and over.
The two most common installation errors we see:
- The joint was grouted instead of caulked. Grout at the tub-to-wall joint is a guaranteed failure. It’s not flexible, and even a small tub movement will crack it, letting water behind the tile.
- Caulk was applied over a wet or dusty joint. Silicone won’t stick to either. The bead looks fine for a few weeks, then peels cleanly away. Prep is the whole job.
What a proper repair looks like: cut out the old caulk with a utility knife (a plastic scraper protects the tub), clean the joint with denatured alcohol, let it dry completely – a day minimum – and fill the joint with 100 percent silicone, not a latex “paintable” caulk. Backer rod in a wide gap keeps the bead from sinking. Give it 24 hours to cure before anyone gets in the tub. If you’re repainting anyway, add a coat of mold-resistant paint over the wall above the surround at the same time so you don’t have to do the job twice.
Floor Tile Lifting or Hollow-Sounding
Floor tile lifts for one of three reasons: bad thinset coverage, no uncoupling layer between the tile and the wood subfloor, or inadequate subfloor thickness for the tile’s span. Tap across the floor with the handle of a screwdriver. A sharp hollow ring means the tile isn’t bonded; a flat thud means it is. Map the hollow spots on a sketch so you know the actual footprint of the problem.
Here’s what a proper floor layup involves, and it’s worth knowing so you can spot a shortcut:
- Confirm joist deflection meets the tile manufacturer’s spec. Heavy natural stone needs a stiffer floor than porcelain.
- Install a cement backer board or an uncoupling membrane such as Schluter’s Ditra over the subfloor.
- Use a modified thinset that meets both the tile’s and the membrane’s spec sheet.
- Back-butter large-format tile so coverage hits the 80 to 95 percent the manufacturer requires.
- Leave a perimeter gap at the walls and fill it with flexible sealant, not grout.
Cosmetic repair – re-grouting or injecting epoxy – works on small hollow patches where only the edges have debonded. Anything bigger, or a lost tile, means pulling it. Once a tile is loose, water gets under it on the next spill, and the problem spreads. A Grand Prairie homeowner who had a contractor skip the membrane on a small hall bath will usually see the first lifted tiles in the second summer, not the first. Heat and humidity cycle the assembly until the weak spot shows.
Diagnosing a Shower Leak vs. Condensation
A water stain on the ceiling below a bathroom is either a plumbing leak, a shower pan leak, or condensation from a cold supply line. All three produce a damp spot, and all three call for a completely different repair. Misdiagnosing this one is expensive, because the wrong fix means you tear into a ceiling and don’t solve the problem.
How to tell them apart without opening anything:
- Timing. A plumbing leak usually shows up all the time, wet or dry season. A shower pan leak appears after someone uses the shower and dries out over a day or two. Condensation appears in cold weather and on cold pipes only.
- Color. A plumbing or pan leak leaves a continuous ring of water stain. Condensation leaves a lighter, wider, sometimes damp-only patch with no defined edge.
- Location. A stain directly under the shower drain or the shower pan edges is almost always a pan leak. A stain at the perimeter, near a cold-water supply line, is often condensation.
- Check the supply. Dry the area, tape a square of aluminum foil over the pipe for a day. Water beads on the outside of the foil means condensation. Wet under the foil means the pipe itself is leaking.
If you determine the shower pan is the source, the repair is not a caulk fix. A failed pan means the waterproofing membrane under the tile is compromised, and the pan needs to come up to the drain. That’s a real renovation, and it’s the exact job we walk clients through in our guide to Bathroom Remodeling in Grand Prairie. Condensation, on the other hand, is often a 30-minute fix: insulate the pipe and size the exhaust fan correctly. If your ceiling stain is under a wall shared with the kitchen, the same pipe insulation approach applies to the plumbing above your Kitchen Remodeling in Grand Prairie work.
Toilet Rocking and Soft Subfloor
A rocking toilet is not cosmetic – it’s a warning sign, and one of the cheapest to catch early. The rocking means the flange, the wax ring, or both have failed, and water has been slowly leaking under the toilet for weeks. Better to assess before you pull the toilet, because once the toilet’s up, you’re committed to the repair whether you’re ready or not.
Here’s the assessment order:
- Rock it gently by hand. If it wobbles side to side but the floor around it feels solid, the wax ring is likely the problem. If the floor under your feet gives, the subfloor is soft and needs repair.
- Check the base with a flashlight. Water stains around the base, or discolored caulk, confirm a leak. Dark or black discoloration suggests moisture has been there a while.
- Press a screwdriver into the floor next to the base. If it sinks in without resistance, the wood is rotted. That’s a full pull-the-toilet job with subfloor repair, not a wax ring swap.
- Pull the toilet and inspect the flange. A plastic flange ring with a crack, or a flange that sits below the finished floor, is the root cause of a leak that keeps coming back.
Repair path: wax ring and closet flange repair for the cosmetic case, subfloor replacement with a new plywood patch for the soft case. If the toilet itself is over 15 years old and the model is discontinued, the moment the wax ring fails is a good moment to swap it for something with a modern rough-in and a water-sense rating. American Standard and Toto both make models that fit standard flanges without a fight.
Exhaust Fan Inadequacy: The Hidden Culprit
An undersized exhaust fan quietly rots your bathroom from the ceiling down. It doesn’t fail loudly. It just doesn’t move enough air, so moisture sits on the walls and ceiling, the paint blisters, mold blooms in the corners, and the grout above the tub stays damp all week. In our experience, this is the most under-diagnosed problem in Grand Prairie bathrooms because the paint damage looks like a paint problem, and the mold looks like a cleaning problem.
CFM sizing by the numbers: The rule of thumb is 1 CFM per square foot of bathroom floor area, with a minimum of 50 CFM for any bathroom attached to a bedroom, and higher for heavy-use bathrooms. A 5-foot by 8-foot hall bath is 40 square feet – right at the minimum – but the same bathroom with 9-foot ceilings and a window that doesn’t open needs more. “Code minimum” for a residential bathroom is a floor, not a target. A 100 CFM fan in a small room clears steam in a fraction of the time a 50 CFM fan does, and the fan runs less often overall.
- Bath under 50 sq ft: 50 to 80 CFM, sized up if the ceiling is high.
- 50 to 100 sq ft: 80 to 110 CFM.
- Over 100 sq ft or a spa-like bathroom with a rain shower: 110 CFM and up, often two fans.
Check the model plate on the fan unit itself – most list their CFM rating. Then check the duct. A fan rated at 110 CFM plugged into a 4-inch flexible duct that snakes 30 feet through an attic is moving far less than its rating. Rigid duct, short runs, and a proper roof or wall cap matter as much as the rated CFM. A Grand Prairie attic runs hot in summer and the flexible duct in a hot attic sags over time, which cuts airflow further. That’s the reason a fan that worked fine on day one feels weak three summers later.
How a Warranty Claim Should Actually Work
A warranty is only as good as the paper trail behind it. The worst position a homeowner can be in is a shower failure with no documentation – no scope of work, no products list, no signed guarantee, and no record of what the original crew installed. Most warranty disputes don’t die because the contractor refused to honor the guarantee; they die because nobody can prove what the guarantee covered.
Here’s what a legitimate warranty claim looks like, and what you should be able to produce if one comes up:
- The signed written scope of work. It should list the actual products installed – the tile, the backer board, the membrane, the thinset, the fixtures, and the exhaust fan model with its CFM rating.
- The written guarantee itself. It should state the covered period and what “fail” means. Bradford’s own promise is the 365-Day Done Right Promise: if the work doesn’t hold within the first year, we come back and correct it at no charge. That’s spelled out in writing on every project.
- Dated photos of the failure. Photograph the crack, the stain, the lifted tile with a tape measure in the frame. Document the arrangement of tiles affected.
- A written description of the failure and its first appearance date. “Started in early spring after the first warm week” is more useful than “started sometime.”
- The original invoice and any receipts for materials. If a product is defective, the manufacturer’s warranty runs parallel to the contractor’s guarantee, and you’ll need both to collect.
What a real claim process should look like from the contractor’s side: a live person answers, a written reply acknowledges the claim within a defined window, a date is set to inspect, and the written guarantee defines whether the fix is repair or full replacement. If a contractor’s guarantee is verbal or doesn’t exist in writing, the claim becomes a negotiation instead of a remedy. That’s not a warranty at all.
Common Mistakes to Avoid
- Re-grouting a cracked shower instead of finding the flex. Grout is rigid, and the substrate is what moved. Re-grout twice and you’ve just spent the cost of the correct fix with nothing solved.
- Caulking over a wet joint. Silicone won’t stick to a damp or dusty surface. Any caulk applied that way will peel within weeks, regardless of the product. Dry the joint for a full day first, every time.
- Skipping the uncoupling membrane to save a line item. A few hundred dollars in membrane prevents thousands in tile replacement. In Grand Prairie, where the swing between a humid spring and a dry summer pushes the subfloor hard, this matters even more.
- Replacing a toilet to “fix” a rocking issue without checking the subfloor. A new toilet on a soft floor rocks just as fast, and the wax ring fails again within a few months.
- Buying a bigger fan without checking the duct run. The fan’s CFM rating is only as good as the duct behind it. Rigid duct and a short run matter more than the number on the box.
- Accepting a verbal guarantee. A guarantee that isn’t written down covers nothing. Ask for the document, read the coverage period, and keep it with the project papers.
- Painting over mold instead of fixing the moisture. Paint over active mold and it returns in a season. Fix the ventilation or the leak first, then repaint.
See the difference
 Before
 After
 Before
 After
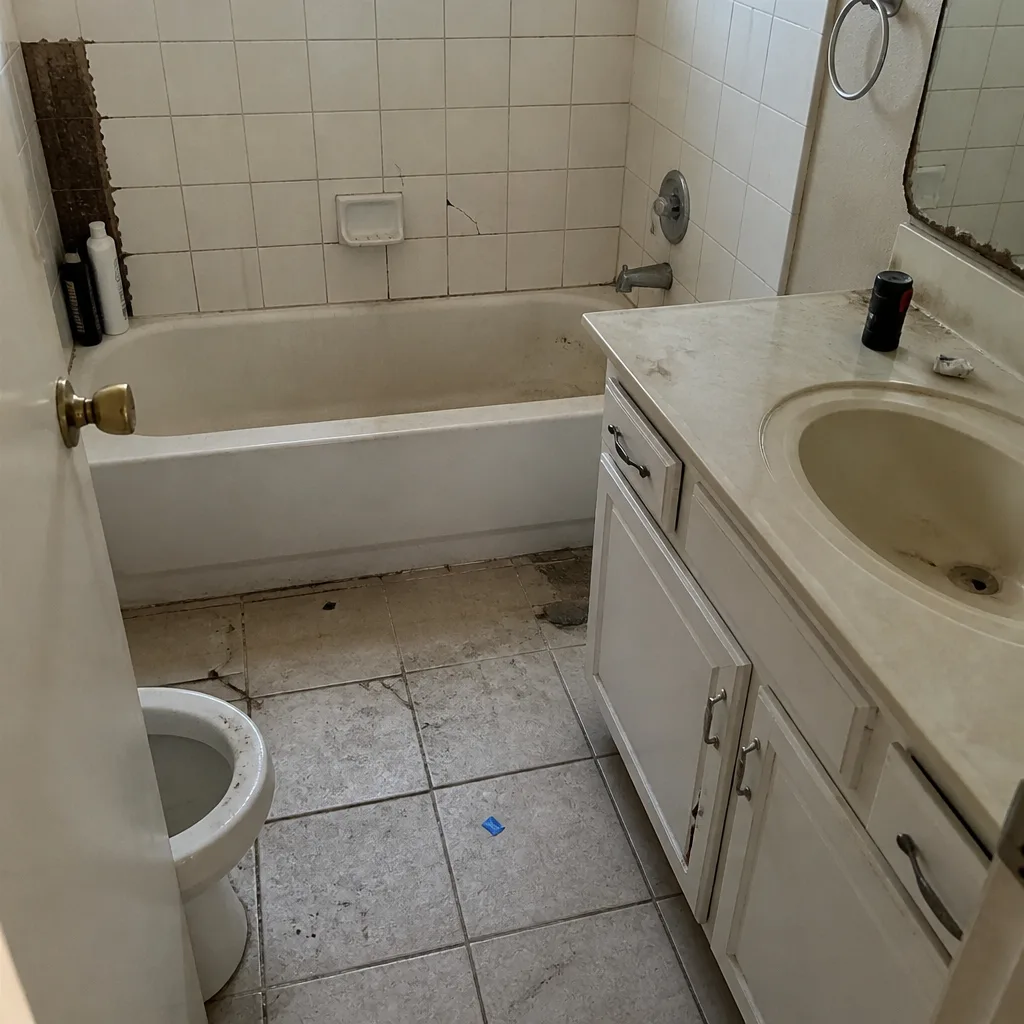 Before
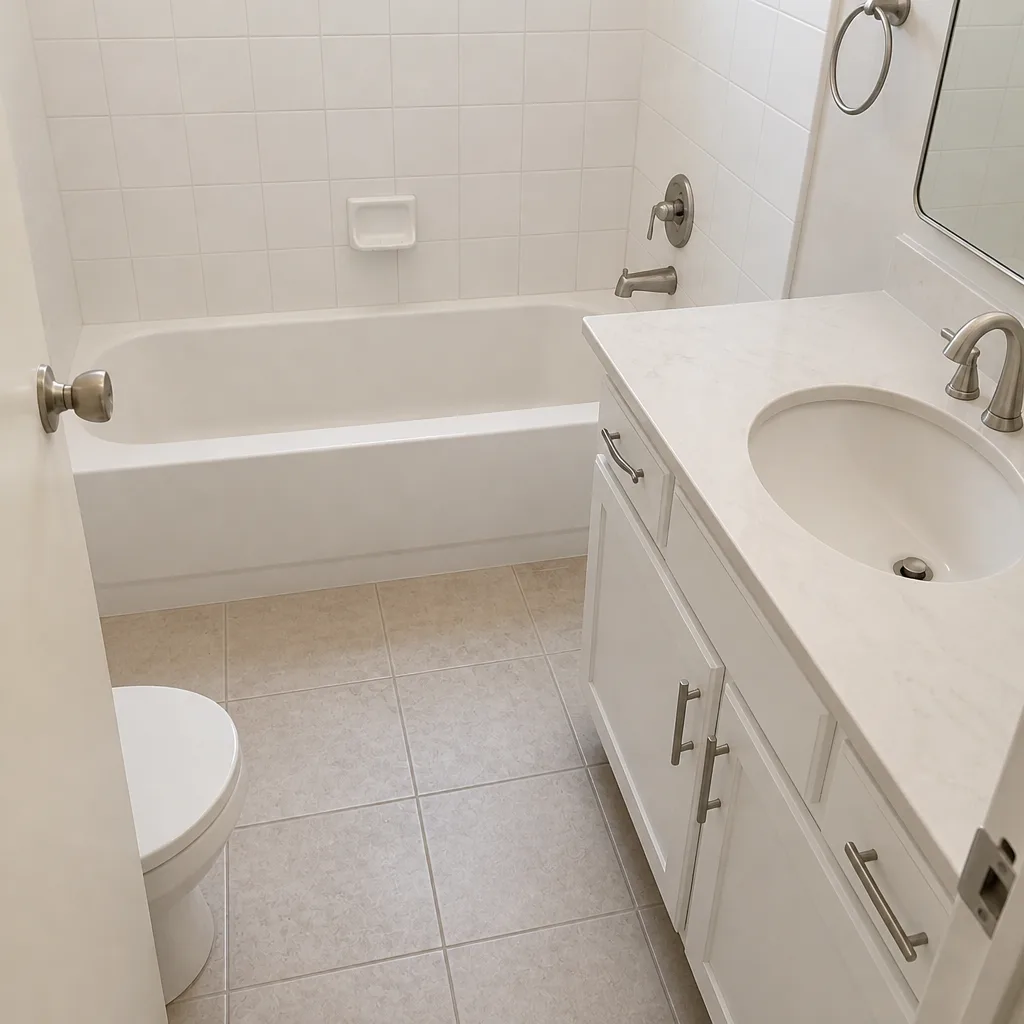 After
When to Call a Professional
Call a professional when the symptom is structural, safety-related, or already tried and failed. A cracked shower pan that’s letting water into the ceiling below, a toilet leaking into a soft floor, a bathroom where the exhaust fan replacement didn’t solve the mold because the ducting was wrong too, or any shower leak where you’re not sure if it’s a pan failure or a supply line – all of those are jobs where a wrong guess costs more than the diagnosis. Bathroom rough-in involves plumbing, waterproofing, and framing decisions that are hard to undo once tile is set. Tile and shower assembly work also requires a level of waterproofing detail (membrane seams, corners, drain flashing) that most homeowners can’t reliably hit on a DIY schedule. Bradford Remodeling Co Grand Prairie offers free estimates in Grand Prairie – call (888) 255-7593. We’ll look at the symptom with you, tell you what root cause we suspect, and quote the repair in writing before any work starts.
Frequently Asked Questions
Because the surface under the grout moved, not because the grout was bad. The most common cause is a substrate that flexes – a floor joist spanning too far, a backer board without the manufacturer’s fastener schedule, or thinset that cured before the tile was set. A shower wall joint that was grouted instead of caulked is the second most common cause. Call (888) 255-7593 to have someone look at it before the crack spreads – estimates are free.
Watch the timing. A pan leak shows up and dries out on a shower schedule – wet after use, dry a day later. Condensation is weather-related and appears mostly on cold days or on cold pipes. A shower pan leak means the waterproofing membrane is compromised and the pan needs to come up. Condensation usually needs pipe insulation and a properly sized fan. Call (888) 255-7593 if you’re not sure which one you have.
Size for 1 CFM per square foot of floor area, and start at 50 CFM for any bathroom. A 5-by-8 hall bath sits at the 40-square-foot line, so 50 CFM is the floor, but a high ceiling or a rain shower faucet pushes the target to 80 CFM or higher. Check your duct run too: a high-CFM fan on a long run of flex duct may not deliver its rated airflow, especially in a Grand Prairie attic in summer. Call (888) 255-7593 for a sizing check with your next project quote.
Not if the quote was written correctly. Bradford’s written price is issued before work begins, and it’s the price you pay. Any legitimate remodeling contractor will tell you what’s in the scope and what’s excluded, and a change order should only appear if you ask for one. If a contractor starts moving numbers at the door, walk away. Call (888) 255-7593 for a written estimate on your bathroom repair.
Not necessarily. A rocking toilet usually means a failed wax ring or a loose closet flange, and a soft floor means the subfloor around the drain is rotted and needs to be replaced. A new toilet on the same soft floor will rock again. Pull the toilet, inspect the flange, and patch the subfloor before replacing the toilet itself. Call (888) 255-7593 to have the floor and flange assessed before you buy a replacement.
Keep the signed written scope, the product list including tile, backer board, membrane, thinset, and exhaust model, the signed guarantee, dated photos of the failure, the original invoice, and any manufacturer warranty paperwork. Most warranty disputes fail because the homeowner can’t prove what was installed or what period the guarantee covered. Call (888) 255-7593 if you’re trying to make a claim on work someone else did and need an assessment.
The Bottom Line
Most bathroom problems aren’t mysterious. They’re a symptom on top of a root cause that was set during rough-in or waterproofing, and the fix is to work backward to that root cause before spending a dollar on a patch. Crack the flex diagnosis before the grout, match the exhaust fan to the room and the duct run, check the subfloor before the toilet, and always keep the paperwork that makes a guarantee enforceable. For a full general contracting scope in Grand Prairie, our General Contractor in Grand Prairie team handles the structural and sequencing side of a bathroom renovation. Bradford Remodeling Co Grand Prairie works with a documented roster of name-brand materials – Schluter waterproofing systems, American Standard and Toto fixtures, KraftMaid cabinetry, and Kohler and Moen fittings – so specs are traceable and the warranty claim at year three is a real claim, not a negotiation. Every price is in writing before a tool comes out, every completed project carries the 365-Day Done Right Promise, and a live person answers the phone around the clock. Call (888) 255-7593 to schedule your free estimate.
Written by the team at Bradford Remodeling Co Grand Prairie.